As you can see, the title is about the hardware, because that’s what defines what you are capable of in the physical world. It lets you imagine what you can achieve mechanically. However, the main focus of this post is instead about gluing components together to actually make them function in the way that you imagined, that is, the software. The main focus here will be on the language we use for fast prototyping. The language used by many mechatronics noobs like us. The noobs who got into this whole thing barely a month ago.
Connecting components
Adafruit Huzzah is based on the ESP8266 chip. The nice thing about these chips is their WiFi capabilities. This makes them perfect as an IoT node for any kind of application which invlolves streaming data in and out of a microcontroller.
The L298N is a motor driver, used to power up to two DC motors with an external DC power. Basically, the microcontroller connects to the logic part of the driver and tells it via Pulse Width Modulation (PWM) how fast the motor should go (by regulating the voltage going to the motor) and the direction of the rotation via two digital outputs from the controller (see below for the wiring).
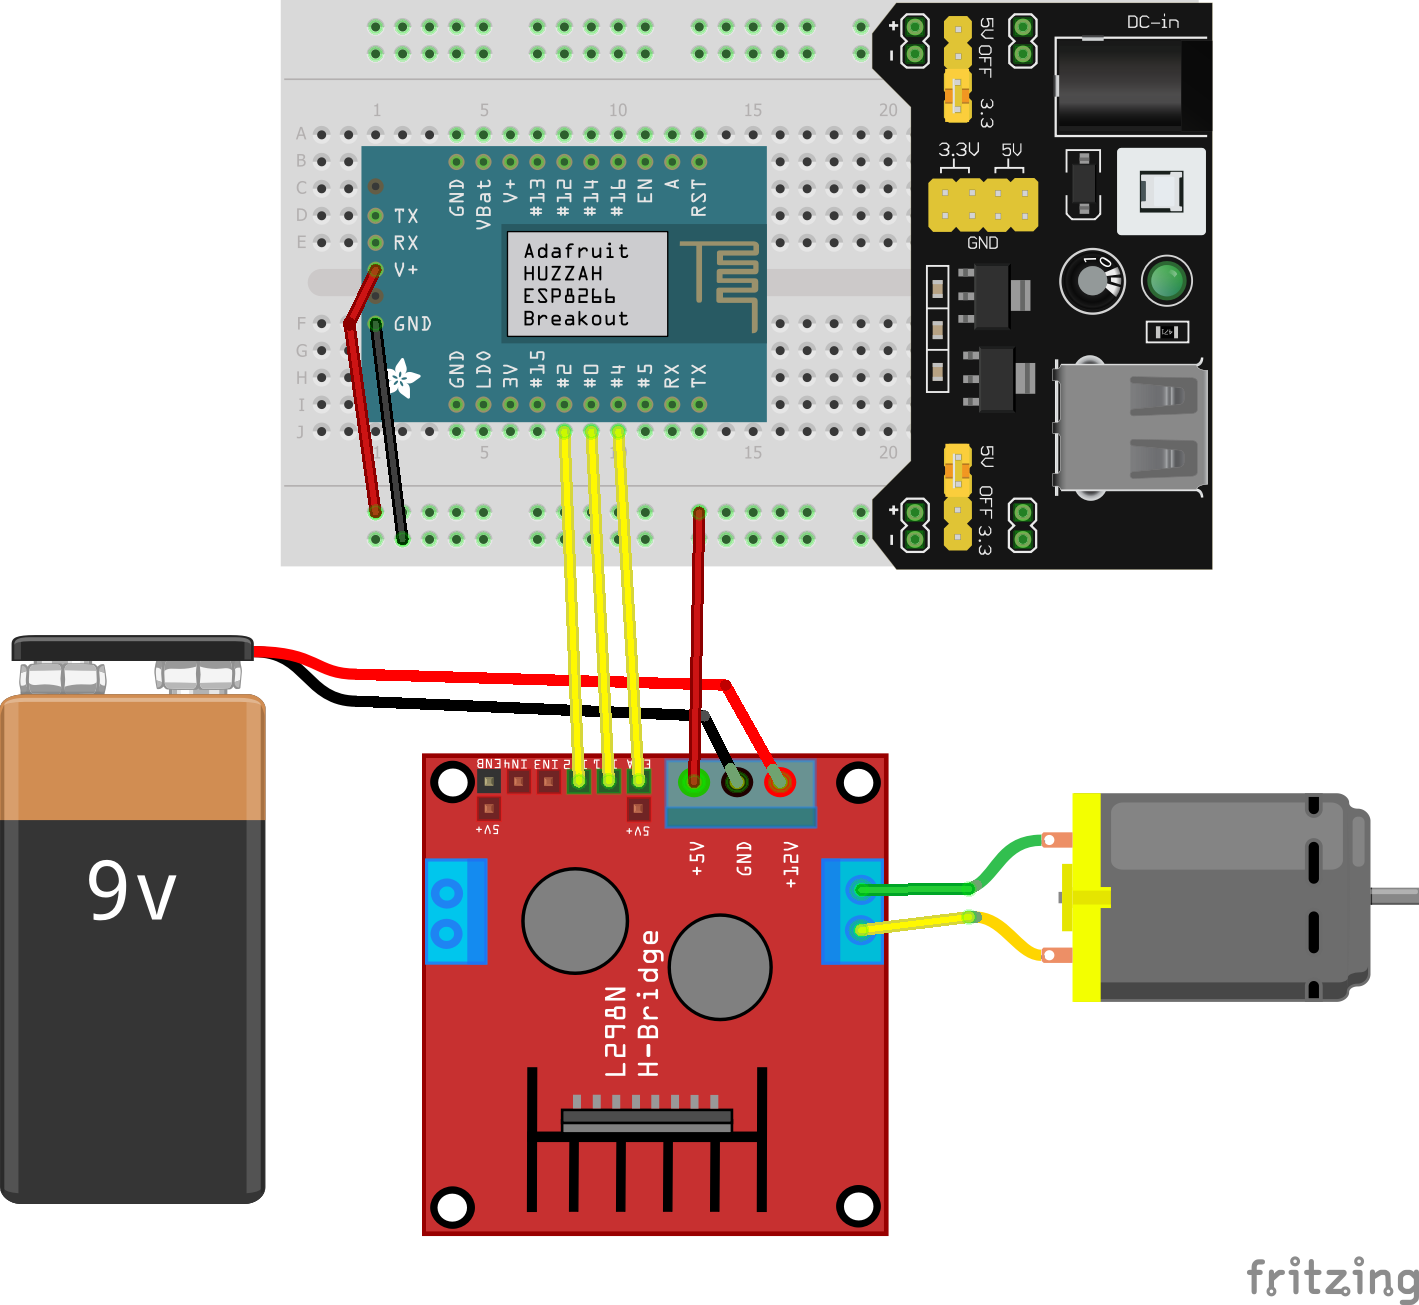
Notice that we also needed to power the logic unit of the driver with 3.3V (can also be 5V). This can either come from the microcontroller itself or whatever you’re using to power it. In this case we powered the Huzzah and the L298N with a breadboard power unit, quite handy for prototyping.
Coding with MicroPython
For learning and prototyping purposes, we chose to mess around with MicroPython. I think it turned out to be just the thing we were looking for. MicroPython has its own ESP8266 machine module which has everything we need to control the pins, including the PWM. PWM frequency in this case is capped to 1KHz and the duty cycle ranges from 0 to 1024. ESP8266 has a single timer and all the PWM pins share the same frequency.
A single DC-motor is controlled by 3 pins; one of which is a PWM pin. If the motor is connected to the Motor A on the driver (see pic), then the EN1 and EN2 should be used to control the direction. Here is the logic:
- EN1 is HIGH and EN2 is LOW: Motor spins clockwise
- EN1 is LOW and EN2 is HGH: Motor spins counter-clockwise
- Both HIGH or both LOW: Motor stops
Then the PWM pin’s duty cycle can be used to regulate the speed.
First, we import the relevant modules to interact with the Huzzah pins (in boot.py):
from machine import Pin, PWM
Let’s start coding! First let’s write the initiator function for the DCMotor class:
class DCMotor:
    def __init__(self, pwm_pin, direction_pin1, direction_pin2):
        """
        pwm_pin: PWM capable pin id. This pin should be connected to ENA/B.
        direction_pin1 and direction_pin1: Direction pins to be connected to
                                           N1/2 or N3/4.
        """
        self.dir_pin1 = Pin(direction_pin1, mode=Pin.OUT)
        self.dir_pin2 = Pin(direction_pin2, mode=Pin.OUT)
        self.pwm_pin = Pin(pwm_pin, mode=Pin.OUT)
        self.pwm = PWM(self.pwm_pin, freq=100, duty=0)
Next, we implement the direction methods in the DCMotor class:
    def forward(self):
        self.dir_pin1.on()
        self.dir_pin2.off()

    def backward(self):
        self.dir_pin1.off()
        self.dir_pin2.on()

    def stop(self):
        self.dir_pin1.off()
        self.dir_pin2.off()
Finally we can use PWM to set the speed, ranging from 0 (off) to 1 (maximum speed):
    def set_speed(self, ratio):
        """
        sets speed by pwm duty cycle value.
        ratio: The speed ratio ranging from 0 to 1.
               Anything above 1 will be taken as 1 and negative
               as 0.
        """
        if ratio < 0:
            self.pwm.duty(0)
        elif ratio <= 1.0:
            self.pwm.duty(int(1024*ratio))
        else:
            self.pwm.duty(1024)
To actually check if the code is functioning (in test_dc_motor.py):
from time import sleep

# P0 -> direction pin 1
# P2 -> direction pin 2
# P4 -> PWM pin
motor = DCMotor(4, 0, 2)

motor.forward()
motor.set_speed(0.5)
sleep(1)
motor.set_speed(0.75)
sleep(1)
motor.set_speed(1.0)
sleep(1)
motor.stop()
sleep(0.1)
motor.backward()
motor.set_speed(1)
sleep(2)
motor.set_speed(0)
motor.stop()
You can send this code to /flash or use ampy to run it in the current session, like so:
sudo ampy --port /dev/tty.SLAB_USBtoUART put boot.py
sudo ampy --port /dev/tty.SLAB_USBtoUART run test_dc_motor.py
And that’s about it for controlling a DC-motor with the L298N driver.